One of the benefits of cloud computing and AWS in particular is the availability of infrastructure on demand. This allows AWS customers to control their resource capacity so they only pay for what they need and consume.
At the design stage you are creating and deploying the resources required to support your applications so they work. Often though, very little consideration is given to when these applications will be used. If they are required 24/7 then this post isn't going to be much help, however if your production environments or replicated staging and development environments are not required all the time then this strategy could save you as much as 70% of your cloud environment costs related to AWS EC2 and RDS instances for a little one-time effort.
What we are discussing is the AWS Instance Scheduler.
The AWS instance scheduler is a simple AWS developed solution that enables clients with Amazon Elastic Compute Cloud (EC2) or Amazon Relational Database Service (Amazon RDS) instances to deploy custom start and stop schedules for these services.
This means you can turn off the instances when they are not in use and of course because they are charged for on an 'on-demand' basis this means the billing stops when they are not in use.
Amazon suggest that resources that are just switched on during regular business hours vs ones that are left running 24/7 could represent a saving of up to 70% of the monthly cost of those EC2 and RDS instances. Typically these resources are the major expenses in a client's cloud infrastructure.
How does AWS Instance Scheduler work?
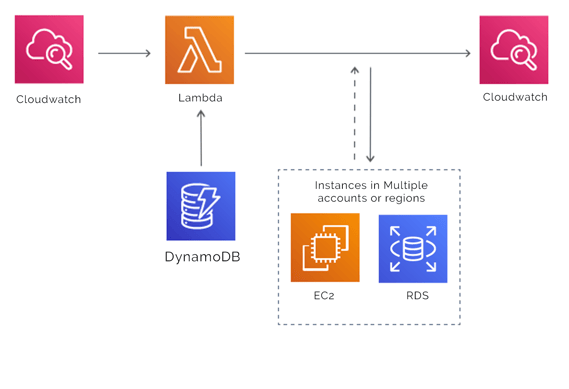 An Amazon CloudWatch event triggers an AWS Lambda function that checks the current state of each appropriately tagged instance against a DynamoDB table that stores the associated schedule details.
The Lambda function applies the appropriate start or stop action to the instance. The Lambda function also records the name of the schedule, the number of instances associated with that schedule and the number of running instances as an optional metric in Amazon CloudWatch.
The cost of running the instance scheduler out of US-East is reported by AWS to be approximately USD$5 in Lambda charges per month unless you have a Lambda free tier usage credit. This cost will be affected by the number of EC2 instances you are running.
During the initial set up of the Instance Scheduler you need to define a tag key that you will use to identify the applicable Amazon EC2 and RDS instances. When you create a schedule, the name you specified as the tag key is used to identify the Schedule and the tag value is used to define the schedule name the resource belongs to.
For instance, you could create a tag key called "Schedule" with a value of "us-office-hours"
The Lambda function when invoked at the prescribed time would check instances with the tag "Schedule=us-office-hours" and look up the DynamoDB schedule details to determine what the desired instance status should be and issues the start or stop commands as necessary.
The Lambda function also records the name of the schedule, the number of instances associated with the schedule and the number of running instances as optional custom metrics in CloudWatch.
Components of the AWS Instance Scheduler (AWS IS)
Scheduler Config Table.
When deployed the AWS IS creates the DynamoDB table containing global config settings. These should be modified from the CloudFormation Stack not directly in the DynamoDb table.
The table also contains a "Type" attribute with a value of "config". Schedules and periods contain "type" attributes with the values "schedule" and "period". You can add, update or remove schedules and periods from the DynamoDB table using the DynamoDB console or the AWS IS command line interface.
Schedules
These define when EC2 or RDS instances should run. Each schedule needs to have a unique name which is used in the previously mentioned tag value.
Periods
Each schedules needs at least one period that defines the times the instance should be running.
Time Zone
You can specify the time zone for the schedule from this list
Hibernate
Related to Amazon Linux, if set to true Ec2 Instances are hibernated when the AWS IS stops them.
Enforce Field
This prevents instances from being manually restarted outside the defined scheduled running times.
Retain Running Field
If enabled, this setting will prevent the scheduler from stopping instances that were manually started prior to the scheduled start time.
SMM Maintenance Window
This will start up instances prior to the AWS Systems Manager Maintenance window so the maintenance functions can be performed. AWS IS then stops instances that should not be running once the AWS SMM has completed it's tasks.
Override Status
If set to 'running' any stop actions will not be performed on the instances in this schedule. The instances will need to be manually stopped. Conversely, if set to 'stopped', the scehduler will not start any instances tagged to this schedule.
Instance Type
This applies to EC2 instances. You may specify an optional instance type within a schedule using the syntax <period-name>@<instance-type>
eg: weekends@t2.nano
Instance types are applied to periods within the schedule (on instance type per period) which allows you to start and stop different instance types independently within the same schedule.
Periods
Period rules contain conditions to set specific hours/days/months an instance will run.
Start and Stop
The begintime and endtime fields define when the AWS IS will start and stop instances.
If either field is defined in isolation then the corresponding command will need to be issued manually. So if you have only defined an 'endtime' then the schedule will never restart the instance and you will need to do this manually.
weekdays - defines a list, range or frequency of days that an instance will run
monthdays - defines which days of the month an instance will run. This can be a range, every n'th day of the month, the last day etc
months - defines which months the instance will run.
Cross-account instance scheduling
The AWS IS solution also contains a template for that creates IAM roles necessary for starting and stopping instances in secondary accounts. Called instance-scheduler-remote this is launched in the secondary accounts after the main instance-scheduler solution is started.
When the remote stack is launched, it creates a cross-account role to allow the AWS IS to perform start and stop actions on instances in the secondary accounts.
Automated Deployment
Once you have reviewed the architecture, configuration and other considerations discussed in the AWS Instance Scheduler Guide it takes around five minutes to deploy your schedules.
The process involves 5 main steps.
1. Launch the Instance Scheduler Stack
- Launch the AWS CloudFormation Template in your AWS Account
- Enter a value for "Stack Name"
- Review and adjust the template parameters
2. Configure Periods
- Create a period and set up the applicable fields
3. Configure Schedules
- Create a Schedule and set the required fields
4. Tag your Instances
- Apply the custom tag to instances you wish to schedule
5. Launch the remote stack in secondary accounts (This is Optional)
- Launch the AWS CloudFormation template in your secondary AWS account(s)
- Enter values for "Stack Name" and "Primary Account"
The AWS instance-scheduler CloudFormation Template is available for download here as a base for your own implementation.
You should refer to the AWS instance scheduler implementation guide for detailed implementation instructions.
The latest templates can be located on Github here : Aws Instance Scheduler
Speeding up the process.
Before you can start setting up your AWS Instance Schedule, you will need to Identify the EC2 and RDS instances you have running across your AWS accounts.
This is simple to accomplish with Hava's AWS architecture diagram tool. Using Hava's automated infrastructure diagrams, you simply open up your hava.io diagrams for your primary and secondary AWS accounts to view your live instances.
Should you have multiple AWS accounts connected to your hava account, you can shortcut the process even further by creating an "on-the-fly" custom diagram just containing EC2 and RDS instances using the custom diagram search tool.
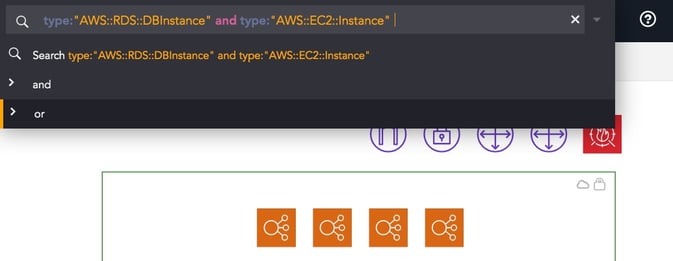
The resulting diagram will detail all of the EC2 and RDS instances from all of your connected AWS accounts so you can determine which primary and secondary schedules need to be created so you can start driving down the cost of your AWS cloud infrastructure.
If you are not already utilising Hava (the Ultimate AWS diagram solution) to automate the documentation of your AWS, Azure and Google Cloud infrastructure, visualise your cloud security and track changes in a fully interactive version history, you can take advantage of a free 14 day trial below.
(no credit card required)


